My HomeLab
Let’s first clarify the word HomeLab. It is mainly used to describe the server and network technology used by individuals at home to learn and educate about current and upcoming IT technology.
My HomeLab consists of several older PCs I’ve repurposed as HomeLab servers, a couple of RaspBerry Pi based µserver, a lot of ESP8266/ESP32 µController, several managed/unmanaged network switches and an AVM Fritzbox router to access the Internet via an M-NET FTTB (fibre to the building) hub.
Main HomeLab Server
My main HomeLab server is a repurposed Intel i7-based PC with 8GB DDR3 RAM and 4TB harddisk I’ve bought in 2011.
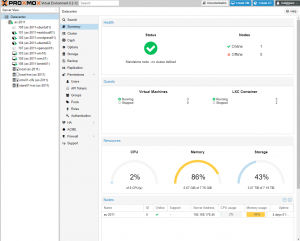
After being unused for several years, I installed Proxmox VE from proxmox.com. The open source software Promox VE provides a virtual environment to install and run Linux Containers (LXC) and KVM-based virtual machines. It can be used free of charge with no limitations. In the case you need professional support you may buy an affordable support subscription.
Proxmox VE provided a treasure trove of features from server virtualization based on LXC and KVM, high availability (HA) cluster, bridged network, flexible software-defined storage, backup&restore and distributed firewall. Most of the administration can be done from the well structured web-based management interface. In addition, it offers a command line interface (CLI) for advanced users and a REST API for integration and automation.
I’ve currently installed and run the following LXCs and VMs:
Ubuntu 20.0.4 LXC: with Docker containers. The containers are managed via the Portainer web interface. Currently it holds containers for an nginx reverse proxy manager and the Bookstack wiki. I’ve installed them via the portainer application method / json file provided by SelfHostedPro.
The nginx reverse proxy container routes all incoming http/https internet browser requests to their endpoints in my local network. In addition it requests and manages SSL certificates from Let’s Encrypt for these endpoints and protects them from internet hacks. Opening the local network for Internet access in my router requires extra care and will only be used in the case I need it.
The bookstack wiki is mainly used to document my HomeLab setup. It provides a well structured web based Wiki for editing and access.
Nextcloud LXC: The Nextcloud Linux container got installed via a template from turnkeylinux.org. Nextcloud provides a self-hosted productivity platform to work, share and collaborate on documents, host files etc. It positions itself as an open source, free of charge alternative to DropBox, Google One or Microsoft 365. The installation via the Linux container template from turnkeylinux.org is well integrated in Proxmox. Most of the administration happens inside of the Nextcloud Web interface.
WordPress LXC: The WordPress Linux Container is based on a template from turnkeylinux.org too. I mainly use it to learn and test changes in the WordPress environment. If I destroy or cripple it, I can easily restore the last backup within Proxmox ;-).
Linux Mint VM: The Linux Mint VM is a standard Linux Mint 20 Ulyana client (Ubuntu 20) with several additional Linux Application like Softmaker’s Office 2021. It can be accessed from anywhere in the network via spice remote desktop protocol clients on Windows, Linux and Android.
OpenMediaVault VM: The OpenMediaVault VM is a standard OMV5 installation using the Debian Linux based installation iso. It is a open source network attached storage (NAS) solution with all standard file server protocols ((S)FTP, SMB/CIFS, NFS, RSync …) and full user and access management. In addition it hosts docker container managed via portainer (see above). Currently it runs docker container for file synchronization (resilio-sync), music & tutorial streaming (plex) and central application dashboard (heimdall). All these container come from the excellent team at linuxserver.io.
Windows 10 VM: The Windows 10 VM got installed via the standard Microsoft installation media according to an excellent description of Techno Tim at Youtube: Virtualize Windows 10 with Proxmox VE. He explains how the download the installation media from Microsoft, get the VirtIO Drivers from Fedora and install Windows inclusive these driver optimizations in Proxmox VE.
Most of these LXCs and VMs run in parallel. Memory and CPU resources are slightly overprovisioned, but the response time is more than adequate. The LXCs use little memory as they leverage the Proxmox Linux system for all the basic OS tasks. The VMs use ballooning drivers to reduce their memory usage if not needed. In Linux the ballooning memory mechanism is integrated, in Wondows it requires a separate driver.
The internal Proxmox bridge network connect the LXCs and VMs with the single physical ethernet controller in the system. All LXCs and VMs have separate fixed IP addresses in my home network.
The storage on the 4 TB harddisk is separated into a standard Linux directory area for installation images, backup etc. and a LVM Thin provisioning area for the container and data images of the LXCs and VMs. With thin provisioning the virtual size of the individual containers can be much higher than the physical available space as long the sum of all container real storage requests does not exceed the physical limits. In additional to the internal 4 TB harddisk I’ve added another 2 TB USB3 harddisk for the data storage of the OMV-based NAS and a CIFS based network access to another (physical) OMV NAS for backup, ISO images etc.
Raspberry Pi µServer
The Raspberry server
µController
The µController
Network
The network
This page will be further updated as I move on in this adventure.
Best regards
Fritz